Results appear as you type. Use the arrow keys to move and Enter to open. Press the slash key to come back here.
Setting up receipt printing
There are two ways of printing receipts. We’d recommend Raw printing: it’s faster and goes straight to the printer without the browser’s print dialogue.
Impresión Raw Recomendada
Prints faster and goes straight to your receipt printer. It needs a small program (QZ) installed, which bridges the browser and the printer.
If you’d rather not install anything, skip to printing from the browser: it’s slower, because it uses the browser’s print dialogue, just like printing any other page.printing from the browser
Raw printing on Windows
This video shows you how to install the receipt printer on Windows 10. The process is exactly the same on Windows 8, 7 and XP.
And this one shows how to do it on Windows 11.
- Download this program and install it. If it asks you to install Java partway through, install that too.
Download Raw printing for Windows Download Raw printing for Windows
- Once it’s installed, click the green printer icon in the taskbar and tick Automatically start, so the program launches when you turn the computer on.
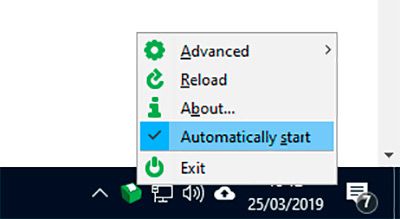
- Install your receipt printer using the generic Windows driver. It’s very easy and takes under a minute: the video above shows the whole process.
- Go into your POS dashboard and click Settings, then Printing.
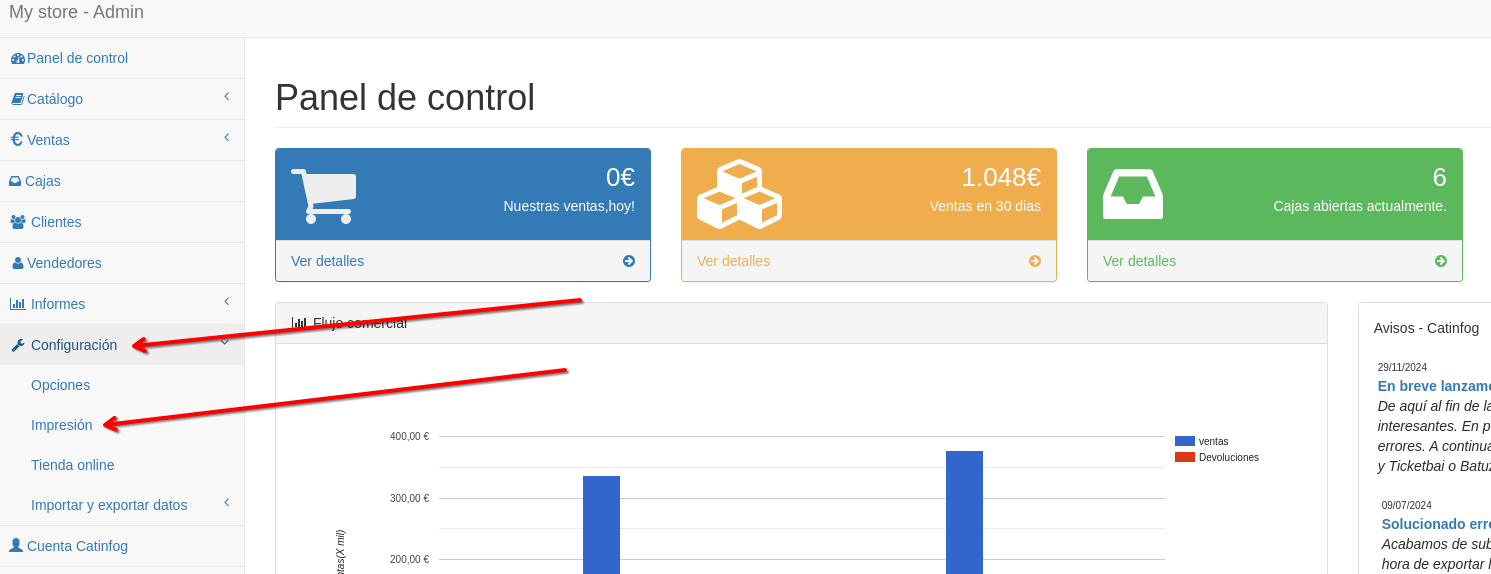
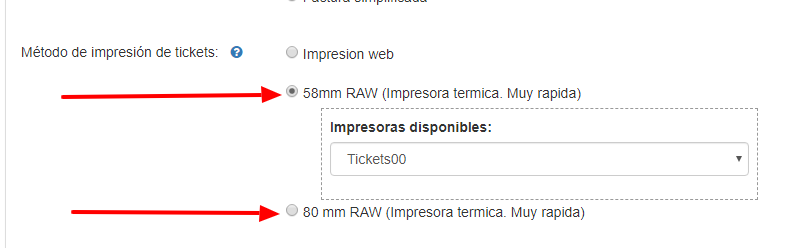
- Under Receipt printing method, choose 58mm RAW or 80mm RAW depending on the width of paper you’ll be using.
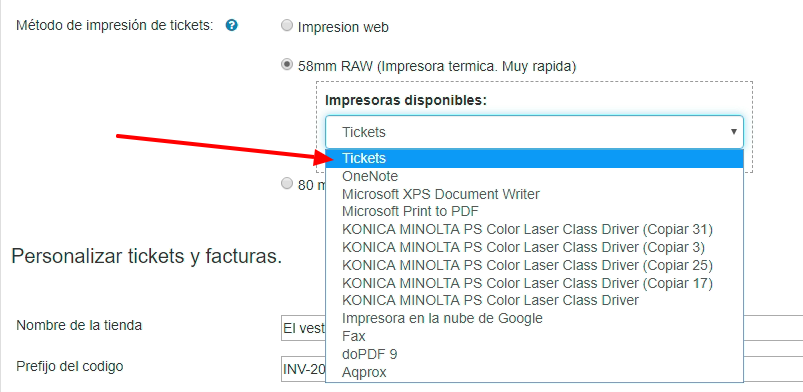
- Select the printer your receipts will come out of.
- Click Save and you’re done.
Raw printing on Mac
This video shows you how to install the receipt printer on a Mac, whatever the version.
- Download this program and install it. If it asks for Java partway through, download it here.
Download Raw printing for macOS Download Raw printing for macOS
- Click the magnifier, type Terminal and open it.
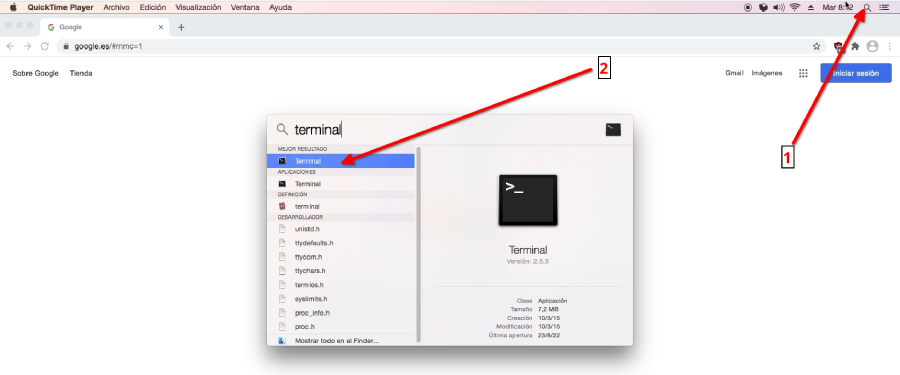
- Escribe este comando y pulsa Enter. Si te pide la contraseña, escríbela y pulsa Enter otra vez.
sudo cupsctl WebInterface=yes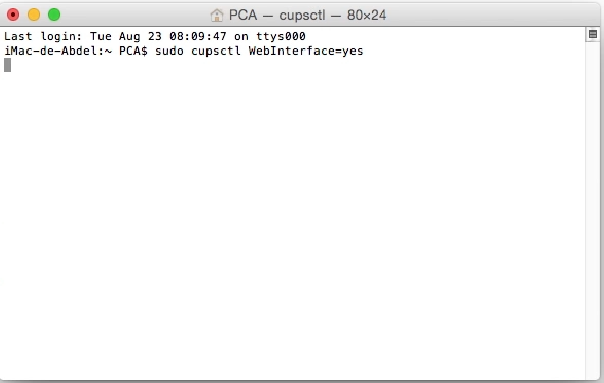
- Abre Chrome (si no lo tienes, puedes descargarlo aquí) y entra en http://localhost:631/
- A security warning appears. Click Advanced y en Proceed.
If you get a 404 error, go straight to http://localhost:631/adminhttp://localhost:631/admin
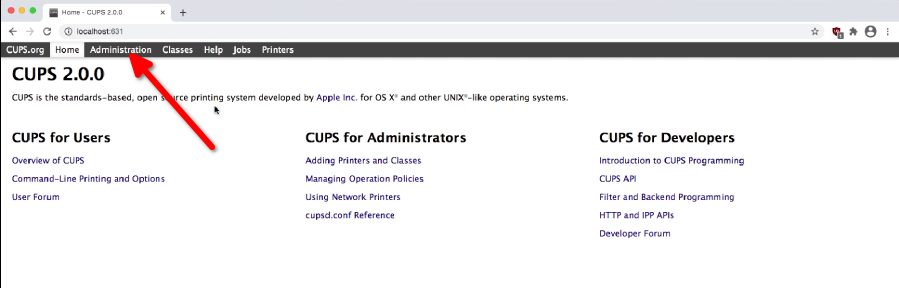
- Click Administration.
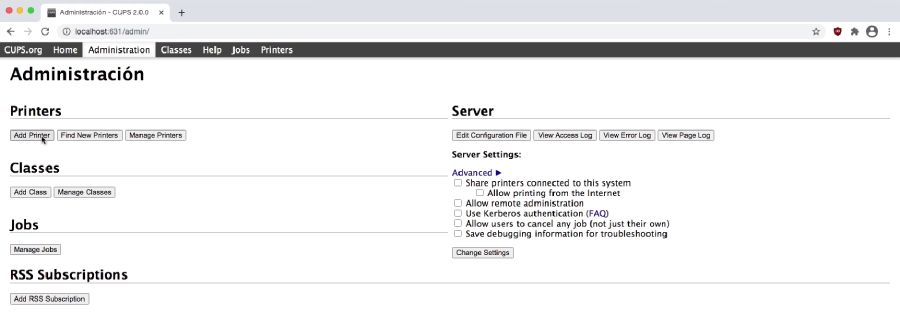
- Click Add Printer.
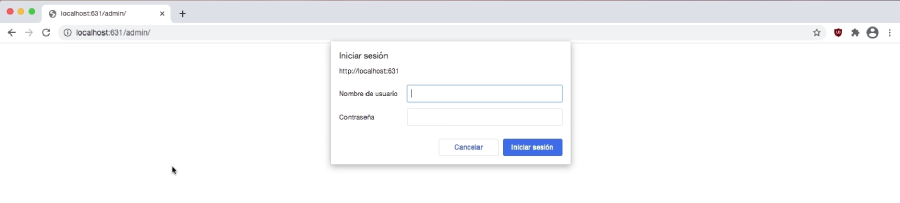
- Enter your username and password.
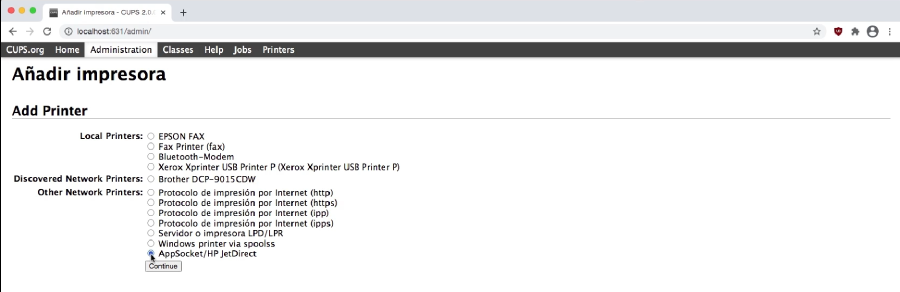
- Choose AppSocket/HP JetDirect and click Continue.
- Abre el Terminal, escribe esto y pulsa Enter:
Copy the printer’s address, paste it into CUPS and click Next.lpinfo -v |grep usb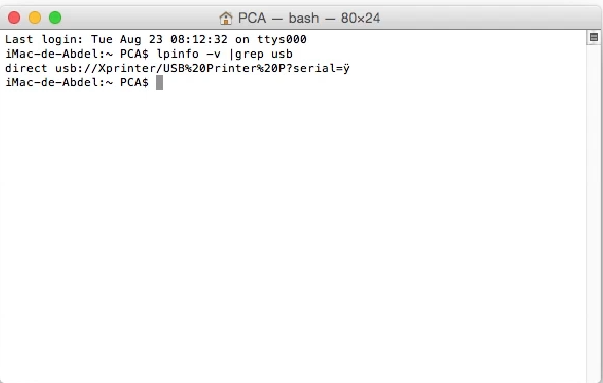
If you get a long address like usb://Canon/D530/D560?serial=1137H3600986&interface=1, copy only up to the question mark: usb://Canon/D530/D560
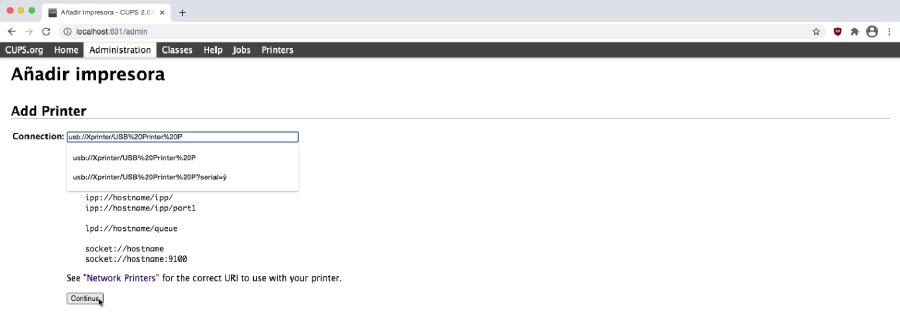
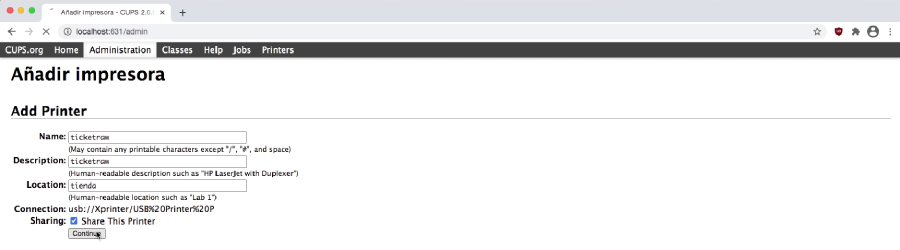
- Enter a name and a description, then click Continue.
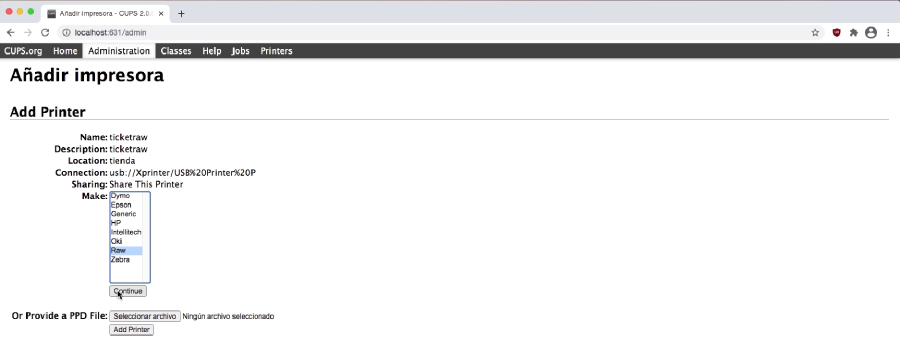
- Click Raw and then Continue.
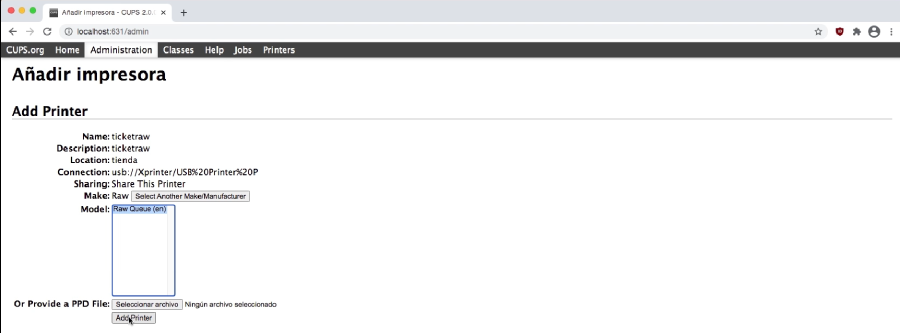
- Choose Raw Queue and click Add Printer.
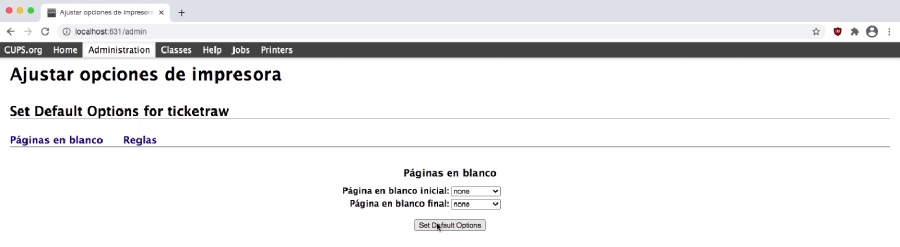
- Click Set Default Options.
- Go to Printers and click the printer you’ve just installed.
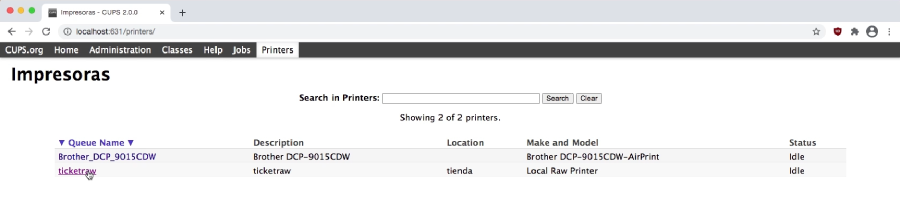
- Click Maintenance and then Print Test Page. The printer should produce a test page: it’s installed.

- Go into your POS dashboard and click Settings, then Printing.
- Under Receipt printing method, choose 58mm RAW or 80mm RAW depending on the paper width.
- Select the printer your receipts will come out of.
- Click Save and you’re done.
Raw printing on Linux
- Comprueba que tienes CUPS instalado:
apt policy cups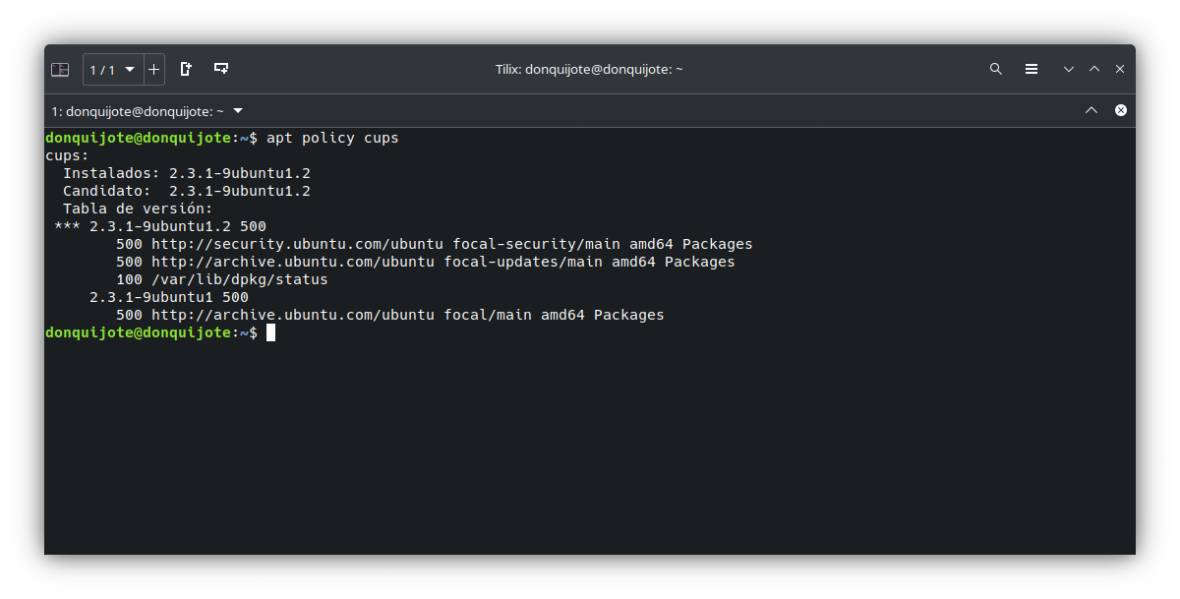
- Abre CUPS en https://127.0.0.1:631/
- A security warning appears. Click Advanced and then Proceed.
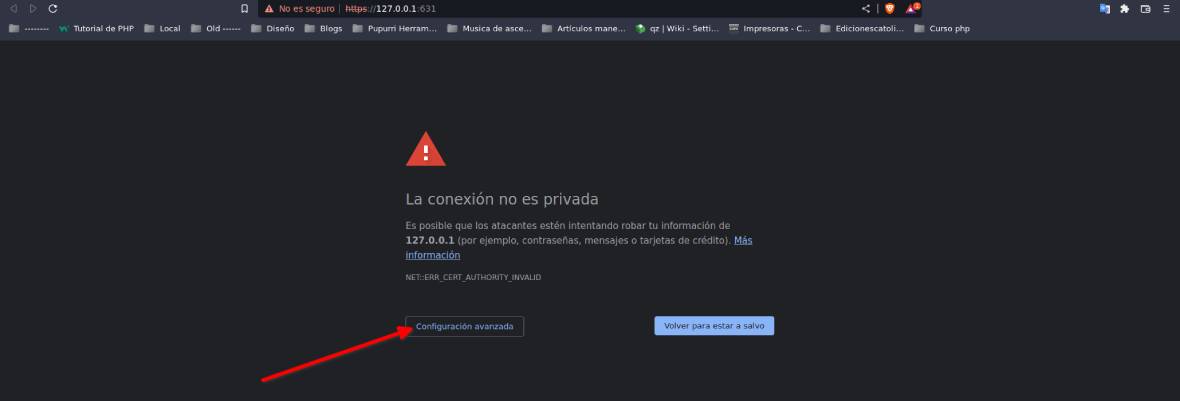
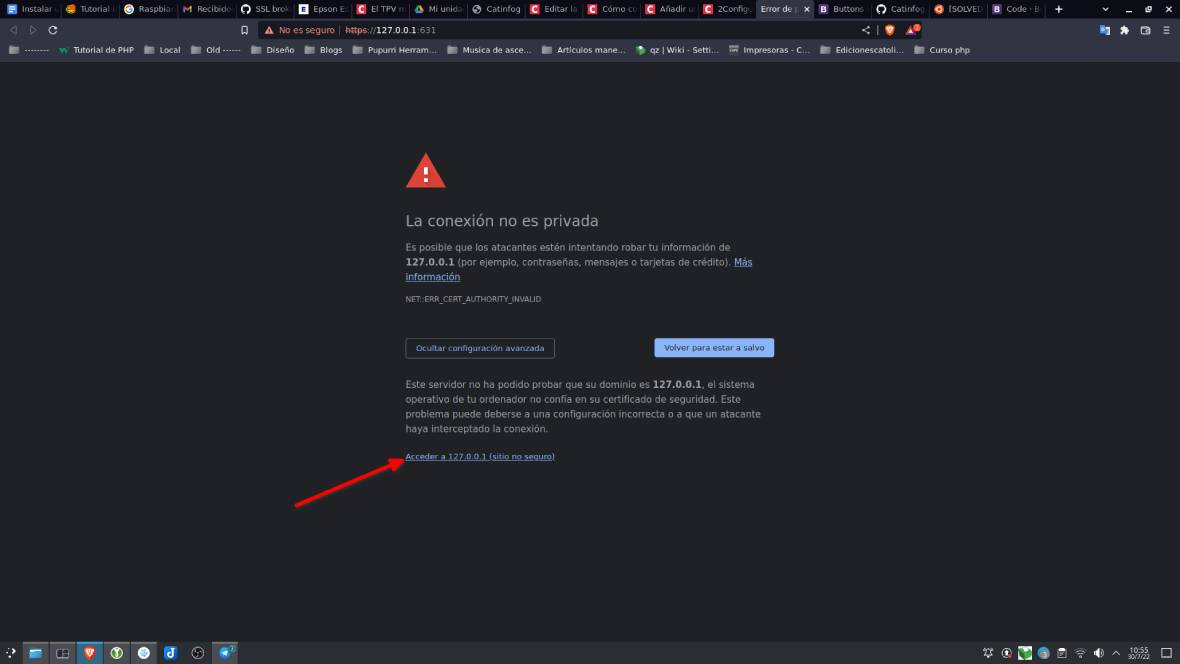
- Click Administration.
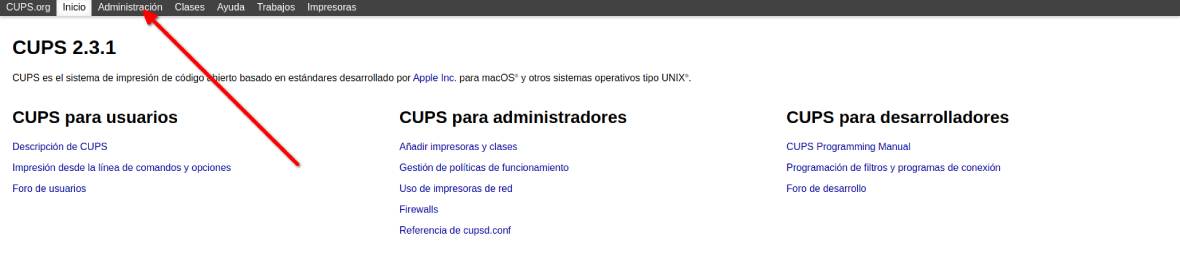
- Click Add Printer.
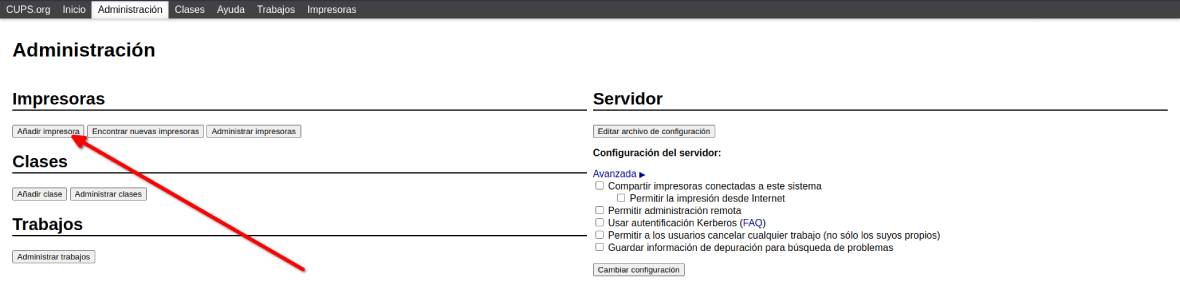
- Enter your Linux username and password.
- Escoge Unknown and click Next.
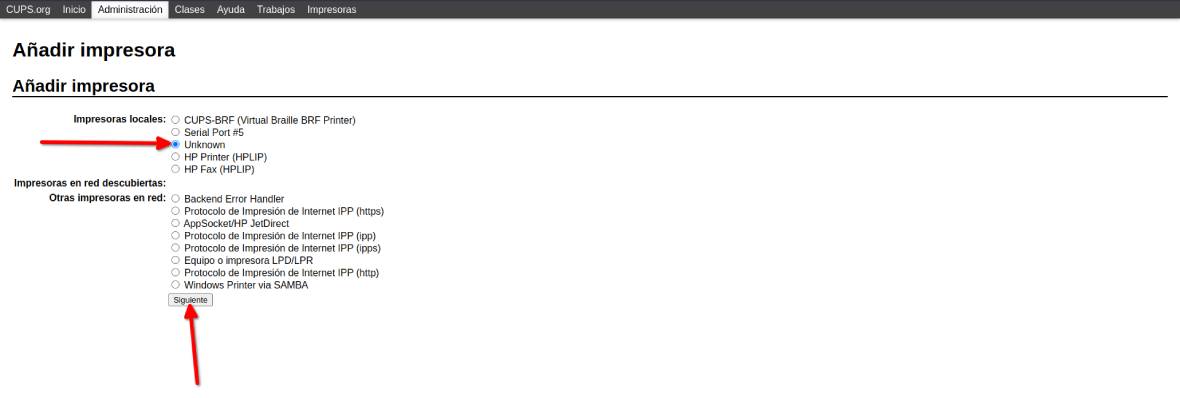
If you can’t see Unknown, the printer most likely isn’t connected or switched on. It could also be the computer’s USB port, the cable or the printer itself.
- Enter a name and a description.
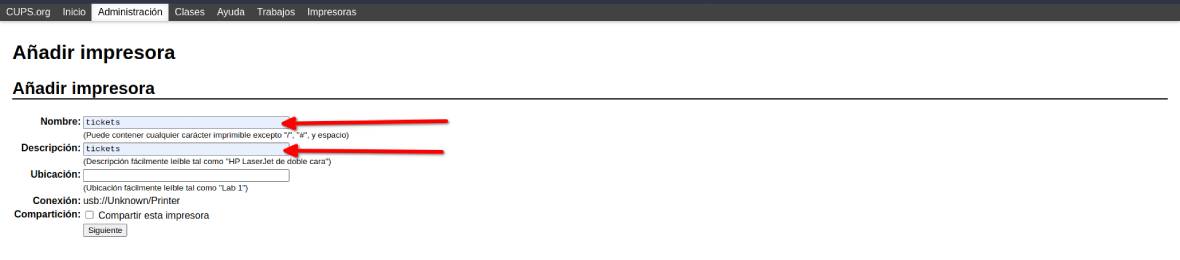
- Choose Raw and click Add Printer.
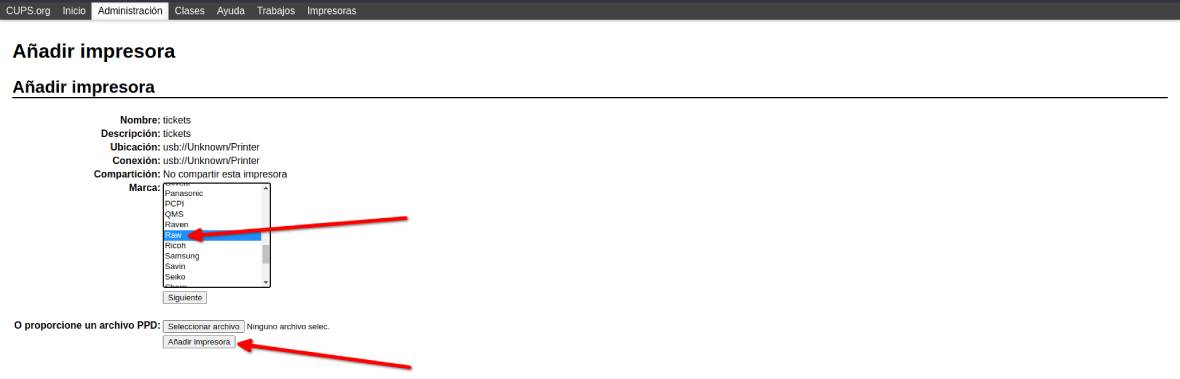
- Choose Raw Queue and click Add Printer.
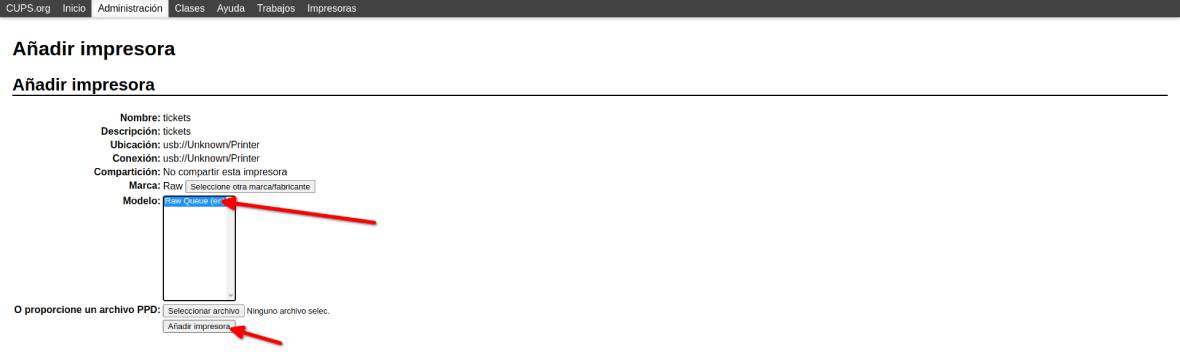
- Click Set Default Options.
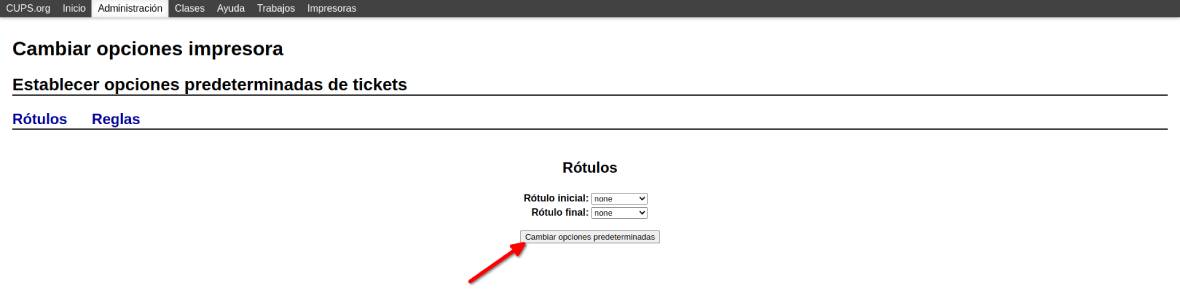
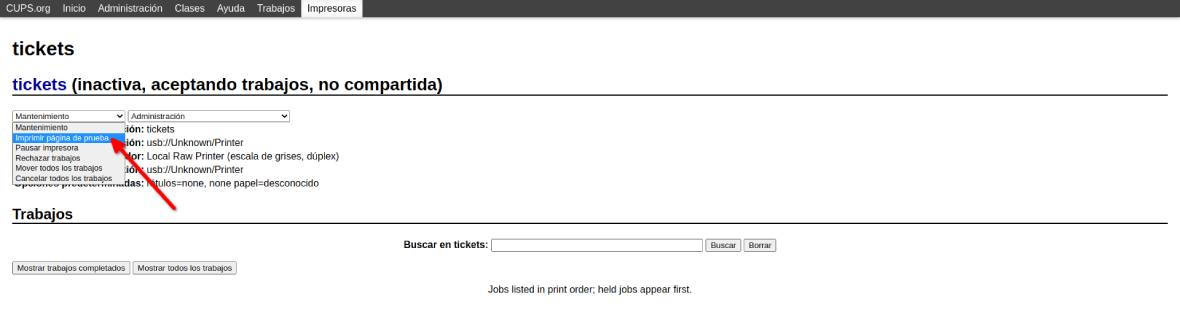
- It’s installed. Now check it works: go to Printers and click the printer you’ve just installed.

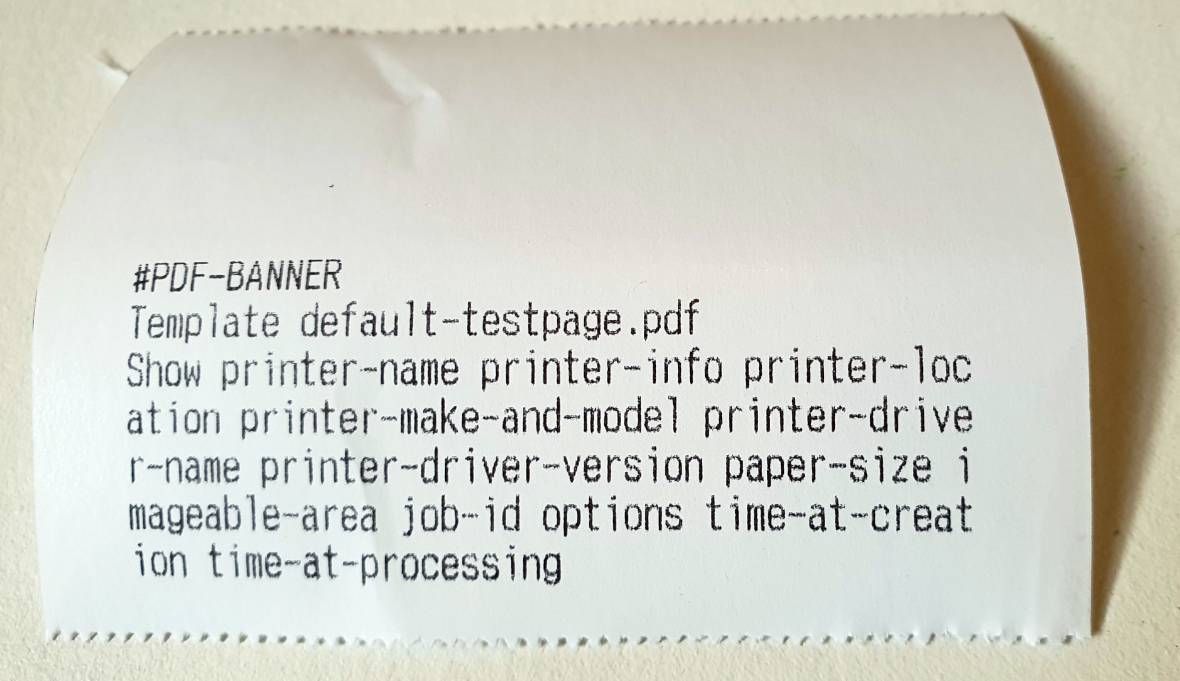
- Click Maintenance and choose Print Test Page. You should get a receipt like this one:
- Now you need to install QZ to connect the printer to Catinfog. Open a terminal and check whether you have Java:
java -version - Si no lo tienes, instálalo:
sudo apt install default-jre - Descarga Qz:
wget https://github.com/zaqueoae/Catinfog/raw/refs/heads/master/qz.run - Dale permisos de ejecución:
chmod +x ./qz.run - Instálalo:
sudo DEBUG=true ./qz.run - Borra el archivo descargado:
sudo rm qz.run - Ya está todo listo. Solo te queda personalizar el ticket.
If you ever want to uninstall QZ, run this in the terminal: sudo bash /opt/qz-tray/uninstall
Printing from the browser
Slower than Raw printing. It prints the receipt through the browser’s own print dialogue, exactly as it would any web page. Nothing to install.
- Make a sale and, when the print dialogue appears, choose your receipt printer by clicking Change.
If your printer isn’t in the list, it isn’t installed on the computer. They usually come with an installation CD, and if you haven’t got it to hand, search for the model on Google: you’ll normally find a manufacturer’s page to download the drivers from.
- With the printer selected, click More settings. Set Margins to None, and use Scale to fit the receipt to the width of your paper. Untick Headers and footers as well.
- Hit print. If the receipt sits neatly within the width of the paper, you’re set. If it doesn’t reach the right-hand edge, increase the scale; if it runs off the edges, reduce it until it’s right.
How to switch on silent printing
Silent printing means the receipt comes out as soon as you make a sale, with no print dialogue appearing. It’s called that because it stays out of your way.
- Open File Explorer and go to Local Disk C › Program Files (x86) — or Program Files if you haven’t got that folder — › Google › Chrome › Application. Right-click the file with the Chrome icon and choose Create shortcut. Accept the message that appears.
- Go to the desktop, right-click the shortcut you’ve just created and, in the Target field, go to the end. Press the space bar and type –kiosk-printing. Click OK.
- To get into silent printing mode, close any Chrome windows you have open and start Chrome from that desktop shortcut. Make a test sale: the receipt prints straight away, without asking.
If you want to give the shortcut a name — “POS”, say — right-click it, choose Rename and type whatever you prefer.